Simple Make Ahead Breakfast Burritos: No-Mush Method

- Time: 25 min prep + 30 min cook = Total 75 mins
- Flavor/Texture Hook: Velvety eggs with a savory, browned sausage crunch
- Perfect for: Hectic work mornings, high protein meal prep, or camping trips
- Simple Make Ahead Breakfast Burritos
- Avoiding the Soggy Wrap Trap
- Quick Setup and Timing
- The Essential Grocery List
- Basic Tools for the Job
- Step by Step Assembly
- Fixing Common Burrito Blunders
- Troubleshooting Common Issues
- Mixing Up Your Fillings
- Storage and Zero Waste
- Serving and Reheating Tips
- High in Sodium
- Recipe FAQs
- 📝 Recipe Card
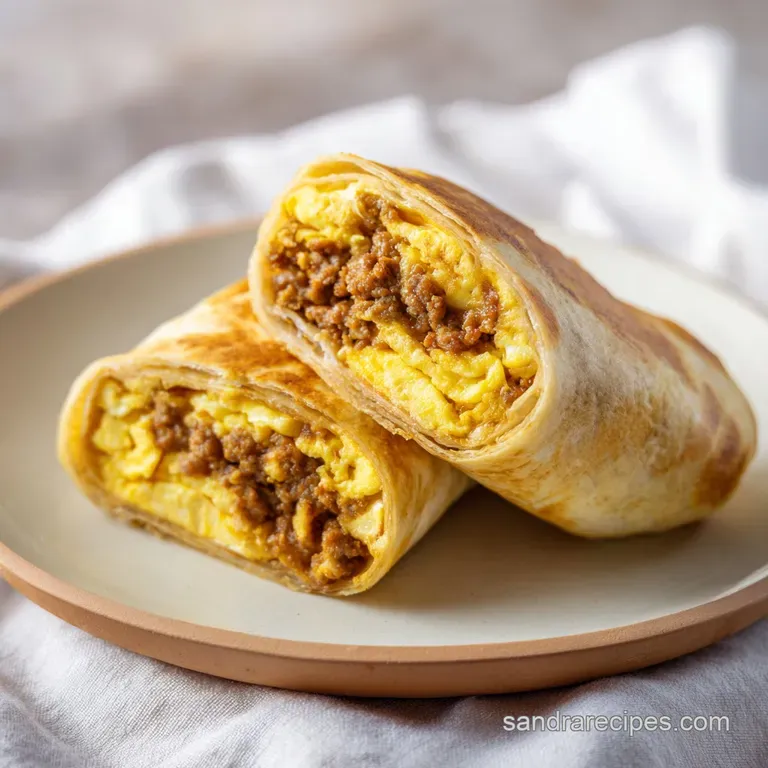
Simple make ahead Breakfast Burritos
The smell of sizzling sausage and sautéed peppers is basically the official scent of a productive Sunday. For me, these wraps aren't just meal prep, they're a nod to the Southwest tradition where the breakfast burrito is king.
I grew up seeing these as the ultimate fuel, a handheld feast that could power someone through a whole morning of ranch work or a long commute. There's something about the way a warm flour tortilla holds together a chaotic mix of eggs and cheese that just feels right.
But let's be real, if you've tried making simple make ahead breakfast burritos before, you've probably dealt with the "soggy bottom" syndrome. I remember one specific disaster where I rolled my burritos while the filling was still steaming.
I thought I was being efficient, but by the time I microwaved them on Tuesday, the tortillas had turned into a wet paste. It was a heartbreaking moment for my breakfast.
That's why I've obsessed over the process. I've learned that the secret isn't in the ingredients, but in the temperature. By letting the filling breathe and cool, you lock in the texture. This recipe gives you that handheld, energizing start to your day without the morning stress.
Trust me, once you nail the cooling window, you'll never go back to buying those frozen store brand versions.
Avoiding the Soggy Wrap Trap
The biggest mistake people make is treating a make-ahead burrito like a fresh one. When you wrap hot eggs in a tortilla and then seal it in foil, you're essentially creating a steam chamber. That steam has nowhere to go, so it soaks directly into the flour, turning your wrap from a sturdy shell into a damp rag.
It's a total mood killer for a Monday morning.
To fix this, we use a "cooling sheet" method. Instead of scooping eggs straight from the pan into the wrap, we spread them out on a baking sheet. This allows the steam to escape into the air rather than into your tortilla.
It takes an extra 20 minutes, but it's the difference between a burrito that holds its shape and one that falls apart in your hands.
Another trick is the "cheese barrier." By placing the shredded cheddar directly on the tortilla before the eggs, you create a thin layer of fat. This fat acts as a shield, preventing any remaining moisture from the eggs from seeping into the bread. It's a small move, but it makes a huge difference in the final bite.
- The Cooling Secret
- Letting the filling reach room temperature stops condensation from forming inside the wrap.
- The Fat Shield
- Cheese acts as a moisture barrier between the wet eggs and the absorbent tortilla.
- Egg Structure
- Adding a splash of milk prevents the eggs from becoming rubbery after they've been frozen and reheated.
| Feature | Fresh Burrito | Shortcut (Frozen) | Impact |
|---|---|---|---|
| Prep Time | 45 minutes | 5 minutes | Massive time save |
| Texture | Pillowy and soft | Slightly denser | Negligible if reheated right |
| Effort | High (active pan work) | Low (microwave/oven) | Ideal for work mornings |
Quick Setup and Timing
Before we get into the heat, let's talk about the gear. You don't need a professional kitchen for this, just a few basics that keep things moving. I prefer a large non stick skillet because it makes the egg cleanup a breeze.
If you have a large rimmed baking sheet, that's going to be your best friend for the cooling phase.
The timing here is pretty straightforward, but don't rush the resting period. You've got 25 minutes of prep to get your veggies diced and eggs whisked, and 30 minutes of actual cooking. The remaining time is just patience.
If you're feeling impatient, you can pop the baking sheet in the fridge for 10 minutes to speed up the cooling, but don't skip it entirely.
Right then, let's look at what we're working with. This is a high protein setup designed to keep you full until lunch. No boring, low-fat substitutions here, because the fat is what carries the flavor and keeps the tortillas from sticking.
The Essential Grocery List
For these simple make ahead breakfast burritos, stick to these specific ingredients for the best result.
- 1 lb lean breakfast sausage Why this? Less grease prevents soggy wraps (Substitute: Ground turkey with sage/salt)
- 10 large eggs Why this? Standard binder for the filling (Substitute: Tofu crumble for vegan)
- 1/4 cup milk Why this? Keeps eggs velvety (Substitute: Unsweetened almond milk)
- 1/2 tsp salt (Substitute: Sea salt)
- 1/4 tsp black pepper (Substitute: White pepper)
- 8 large flour tortillas Why this? Pliable for rolling (Substitute: Whole wheat tortillas)
- 2 cups shredded sharp cheddar cheese Why this? Strong flavor profile (Substitute: Pepper Jack for heat)
- 1 medium yellow onion, finely diced (Substitute: Shallots)
- 1 red bell pepper, finely diced (Substitute: Green pepper)
- 1 tbsp olive oil (Substitute: Avocado oil)
Component Analysis
| Ingredient | Science Role | Pro Secret |
|---|---|---|
| Lean Sausage | Flavor & Structure | Brown deeply for more savory notes |
| Whole Milk | Protein Stabilization | Prevents eggs from "weeping" water |
| Flour Tortilla | Structural Envelope | Warm slightly before rolling |
| Sharp Cheddar | Moisture Barrier | Use a coarse shred for better melt |
Basic Tools for the Job
You don't need a mountain of gadgets. A decent spatula is key for breaking up the sausage and folding the eggs without overworking them. I usually use a silicone one because it scrapes every last bit of egg from the pan.
A large mixing bowl is necessary for the eggs, and a baking sheet is mandatory for the cooling window. If you're planning on freezing these, have some aluminum foil and freezer safe Ziploc bags ready. The foil keeps the burritos tight, and the bags prevent freezer burn.
Chef's Note: If you're rolling a lot of these, lay out your tortillas on a clean kitchen towel. It stops them from sliding around your counter while you're stuffing them.
Step by step Assembly
Let's crack on with the cooking. Follow these steps closely, especially the cooling part.
- Heat olive oil in a large non stick skillet over medium heat. Add diced onion and red bell pepper, sautéing until translucent and soft. Note: Don't brown them too much; you want a soft contrast to the meat.
- Add the lean breakfast sausage to the skillet, breaking it apart with a spatula, and cook until browned and no longer pink.
- In a separate bowl, whisk together eggs, milk, salt, and black pepper until fully combined.
- Pour the egg mixture into the skillet with the meat and vegetables. Stir gently on low medium heat until eggs are soft curd and barely set. Note: Stop cooking while they still look slightly wet; they'll finish cooking during the reheating process.
- Transfer the mixture to a large baking sheet and spread flat. Let cool for 15–20 minutes until the steam stops rising.
- Lay a flour tortilla flat and sprinkle 1/4 cup of shredded cheddar cheese in the center.
- Scoop a portion of the cooled egg mixture on top of the cheese.
- Fold the left and right sides inward, then roll from the bottom up tightly until you have a secure cylinder.
Fixing Common Burrito Blunders
Even with a plan, things can go sideways. Most issues come down to moisture or temperature. If your burritos are leaking or the tortillas are splitting, it's usually a rolling or heating issue.
Troubleshooting Common Issues
| Issue | Solution |
|---|---|
| Why Your Burrito Is Soggy | This is the most common complaint with simple make ahead breakfast burritos. It happens when you wrap the filling while it's still steaming. The trapped heat turns into water, which the tortilla absor |
| Why Tortillas Crack | When you reheat a frozen burrito in the microwave, the outer edge often dries out and cracks before the center is warm. This is because the microwave heats unevenly. |
| Why Filling Falls Out | If your roll is too loose, the ingredients will shift during reheating and spill out the ends. The key is a tight tuck at the bottom. Quick Fix Table |
Mistakes Checklist
- ✓ Did you let the eggs cool for at least 15 minutes?
- ✓ Is the sausage browned and not just grey?
- ✓ Did you place the cheese under the eggs?
- ✓ Are the tortillas rolled tightly without gaps?
- ✓ Did you use lean sausage to avoid grease pools?
Mixing Up Your Fillings
Once you've got the base down, you can start experimenting. If you want to make these high protein freezer breakfast burritos, try adding black beans or swapping the sausage for lean ground turkey. You can also toss in some spinach at the very end of the egg cooking process for a bit of greenery.
For those who want to make easy make ahead breakfast burritos for camping, I recommend adding a bit of canned diced green chiles for a punch of acidity that cuts through the richness of the cheese. It's a great way to wake up the taste buds in the morning air.
If you're planning a bigger weekend spread, these pair brilliantly with some Easy Fluffy Pancakes for a full blown feast. And for dessert? I always suggest a slice of Pumpkin Cheesecake to round out the morning.
Decision Shortcut
- If you want more heat → Use Pepper Jack cheese and add jalapeños.
- If you want more fiber → Use whole wheat wraps and add black beans.
- If you're serving a crowd → Bake the eggs in a sheet pan and slice into squares for easier filling.
Storage and Zero Waste
Storing your simple make ahead breakfast burritos is where the longevity happens. For the fridge, wrap each burrito tightly in foil and store them in an airtight container for up to 4 days. If you're going for the long haul, the freezer is your best bet.
To freeze, wrap each burrito in foil, then place all of them in a heavy duty freezer bag. Squeeze out as much air as possible to prevent freezer burn. They'll stay fresh for about 3 months. When you're ready to eat, just move one to the fridge the night before for a faster thaw.
Regarding zero waste, don't toss your veggie scraps. The ends of the red pepper and the onion peels can be stored in a freezer bag and used later to make a rich vegetable stock. Also, if you have a little bit of egg mixture left over, just fry it up for a quick snack while you're cleaning up the kitchen.
Serving and Reheating Tips
The way you reheat is just as important as how you cook. If you're in a rush, the microwave is the go to, but there's a trick to it. Wrap the frozen burrito in a damp paper towel. This creates a small steam pocket that re hydrates the tortilla, keeping it soft rather than chewy.
Microwave for 1–2 minutes, turning halfway through.
For a better texture, try the oven or air fryer. Heat at 350°F (180°C) for about 15 minutes, turning once. This gives the outside a slight crunch that is absolutely shatter worthy.
If you have a panini press, that's the gold standard it presses the burrito flat and toasts the exterior.
- Myth
- You can't freeze eggs. Truth: Eggs freeze just fine, especially when mixed with milk and fats like cheese, which protect the protein structure from breaking down.
- Myth
- Searing the sausage "seals in" the flavor. Truth: Searing creates a browned crust (flavor), but it doesn't seal anything in. It's all about the savory depth.
- Myth
- Frozen burritos are always mushy. Truth: Only if you skip the cooling phase. Properly cooled burritos maintain their structural integrity.
Scaling Guidelines
- Scaling Down (1/2 batch): Use 1/2 lb sausage and 5 eggs. Reduce the sauté time by about 5 minutes and use a smaller pan to keep the heat concentrated.
- Scaling Up (2x batch): Use a very large skillet or cook the meat and eggs in two separate batches. Do not double the salt and pepper linearly use about 1.5x the seasoning to avoid oversalting.
- Batch Baking: If making 20+ burritos, bake the eggs in a greased 9x13 baking pan at 350°F (180°C) for 15-20 minutes, then cut into rectangles for fast assembly.
High in Sodium
890 mg 890 mg of sodium per serving (39% 39% of daily value)
The American Heart Association recommends a daily sodium limit of 2,300 mg for most adults to maintain heart health.
Tips to Reduce Sodium
-
Swap Processed Sausage-25%
Replace commercial breakfast sausage with ground turkey or pork seasoned with sage, thyme, and red pepper flakes to avoid processed preservatives.
-
Omit Added Salt-25%
Remove the 1/2 tsp of added salt entirely; the cheese and sausage already provide significant sodium for seasoning.
-
Reduce Cheese Amount-15%
Use a low-sodium sharp cheddar or reduce the amount of cheese by half to cut down on dairy based sodium.
-
Select Low-Sodium Wraps-10%
Substitute standard flour tortillas for corn tortillas or low-sodium flour versions to lower the base sodium count.
-
Boost Fresh Aromatics
Add fresh cilantro or chopped parsley to the filling for bright, natural flavor without adding any salt.
Recipe FAQs
Can breakfast burritos be made ahead of time?
Yes, they are ideal for meal prep. Wrap them in foil and store in an airtight container for up to 4 days in the fridge or 3 months in the freezer.
Can a diabetic have a breakfast burrito?
Yes, but monitor the portion size. Focus on the protein rich eggs and sausage while being mindful of the carbohydrate content in the flour tortilla.
How to prep breakfast burritos so they don't get soggy?
Cool the mixture on a baking sheet for 15 20 minutes before wrapping. This prevents steam from being trapped inside the tortilla, which is the primary cause of sogginess.
How to make breakfast burritos for a crowd?
Sauté the onion, pepper, and sausage in one large non-stick skillet to maximize efficiency. If you enjoyed the bulk organization here, see how the same principle works in these meal prep jars.
How to reheat frozen burritos without cracking the tortilla?
Thaw in the fridge overnight and reheat with a damp paper towel. This adds moisture back to the outer edge to prevent the microwave from drying it out.
Why did my burrito filling fall out?
Loose rolling causes the filling to shift during reheating. Fold the left and right sides inward first, then roll tightly from the bottom up to create a secure cylinder.
Is it true you must brown the vegetables before adding the sausage?
No, this is a common misconception. Sauté the onion and red bell pepper only until translucent and soft to maintain a textural contrast with the browned meat.
Simple make ahead Breakfast Burritos