Homemade Marshmallows: Pillowy and Velvety
- Time:15 minutes active + 8 hours 10 mins chilling = Total 8 hours 25 mins
- Flavor/Texture Hook: Cloud like, velvety, and melts instantly on the tongue
- Perfect for: Cozy hot chocolate toppers, s'mores nights, or a sweet gift for friends
- Making Soft Homemade Marshmallows
- Secrets for a Cloud Like Texture
- Understanding the Main Ingredients
- The Building Blocks
- Gear for the Best Results
- Step-by-Step Cooking Guide
- Fixing Common Texture Issues
- Troubleshooting Common Issues
- Fun Flavor Swaps
- Adjusting Your Batch Size
- Truths About Candy Making
- Storage and Freshness Tips
- Best Ways to Serve
- Recipe FAQs
- 📝 Recipe Card
Making Soft Homemade Marshmallows
That specific, sweet scent of warm vanilla hitting the air is the best part of this process. But let's be real, my first attempt at this was a disaster. I didn't use a thermometer and ended up with these rubbery, dense bricks that felt more like erasers than candy.
I remember trying to bite into one and nearly chipping a tooth, wondering where I went wrong.
The problem was the sugar temperature. I just guessed "boiling," but in the world of Homemade Marshmallows, a few degrees are the difference between a cloud and a rock. Once I started tracking the heat and really focusing on the bloom, everything changed.
Now, I can promise you a result that's completely different from the store-bought stuff. We're talking about a treat that's light, airy, and has a gentle chew. It's honestly a bit of a magic trick watching a liquid syrup turn into a stiff, snow white foam.
Secrets for a Cloud Like Texture
Since we're treating this like a love language in the kitchen, we need to understand how the texture actually happens. It's not about fancy equipment, but about how we handle the ingredients.
Air Trapping: The high speed whipping forces millions of tiny air bubbles into the mixture. The gelatin then acts like a net, locking those bubbles in place so the treat doesn't collapse.
Sugar Stability: Cooking the syrup to exactly 115°C creates a specific concentration of sugar. This ensures the marshmallow is stable enough to hold its shape but soft enough to melt.
The Bloom: Letting the gelatin sit in cold water first hydrates the proteins. If you skip this, you get lumps of rubber instead of a silky smooth foam.
Moisture Balance: The corn syrup prevents the sugar from crystallizing. This is why the final result is velvety and smooth rather than grainy or sandy.
| Method | Time | Texture | Best For |
|---|---|---|---|
| Stovetop | 10 mins | Classic bounce | Standard batches |
| Oven set | 2 hours | Denser/Chewier | Specialized molds |
Right then, let's look at what these ingredients actually do. It's not just about following a list, but understanding the role each one plays in the final bounce.
Understanding the Main Ingredients
| Ingredient | Science Role | Pro Secret |
|---|---|---|
| Gelatin Powder | Structural frame | Bloom in cold water only to avoid premature melting |
| Corn Syrup | Anti crystallizer | Prevents the "grainy" feel in the final chew |
| Cane Sugar | Bulk and sweetness | Use a heavy bottomed pan to avoid hot spots |
| Vanilla Extract | Aroma and depth | Add at the very end to keep the flavor from evaporating |
Most people get intimidated by the corn syrup, but it's the real hero here. Without it, the sugar would likely crystallize as it cools, leaving you with a gritty texture. If you're looking for other ways to play with sweetness, you might love the way we use coconut sugar in our Red Velvet Brownies, though for marshmallows, corn syrup is the gold standard.
The Building Blocks
Here is everything you'll need. Make sure your gelatin is unflavored, or you'll end up with some very strange tasting treats.
- 3 tbsp unflavored gelatin powder Why this? Creates the essential bouncy structure
- 1/2 cup cold water Why this? Essential for the bloom process
- 2/3 cup granulated cane sugar Why this? Provides the main sweetness and body
- 1/3 cup light corn syrup Why this? Keeps the texture smooth and velvety
- 1/4 cup water Why this? Dissolves the sugar evenly
- 1/4 tsp salt Why this? Balances the sugar so it's not cloying
- 1 tbsp pure vanilla extract Why this? Adds that classic, cozy aroma
- 1/4 cup cornstarch Why this? Stops the marshmallows from sticking to the pan
- 1/4 cup powdered sugar Why this? Creates a soft, non sticky coating
| Original Ingredient | Substitute | Why It Works |
|---|---|---|
| Corn Syrup | Maple Syrup | Similar viscosity. Note: Adds a distinct maple flavor |
| Cane Sugar | Honey | Liquid sweetener. Note: Alters the boil temp; results are denser |
| Gelatin | Agar Agar | Plant based thickener. Note: Texture is more "jelly" and less "bounce" |
It's important to remember that Homemade Marshmallows are sensitive to changes. If you swap the gelatin for something else, the "pull" of the candy will change. For those wanting a plant based version, you can make vegan marshmallows, but unfortunately you cannot substitute the gelatin with agar agar in this recipe. Gelatin is what gives that specific stretch. You can find a specialized recipe from Serious eats if you need a strictly vegan alternative.
Gear for the Best Results
You don't need a professional kitchen, but a few tools make this a lot easier. I've tried doing this with a hand mixer, and honestly, your arm will be shaking by the end.
A stand mixer, such as a KitchenAid, is the best bet here. The high speed and stability are what allow the mixture to reach that "snow white" stage. You'll also need a medium saucepan with a thick bottom so the sugar doesn't burn in the corners.
The most critical piece of gear is a candy thermometer. Don't try to eye ball the "soft ball stage." Get a digital one that clips to the side of the pot. A 9x9 inch baking pan is standard, and parchment paper is a must. Trust me, trying to grease a pan with butter for this is a recipe for a sticky nightmare.
Step-by-step Cooking Guide
Let's crack on with the actual making. Take your time with the syrup; it's the only part where you really have to be careful.
Phase 1: The Bloom & Pan Prep
Line your 9x9 inch baking pan with parchment paper, making sure there's an overhang on the sides for easy lifting. Mix your cornstarch and powdered sugar together and dust the paper generously. In your stand mixer bowl, sprinkle the 3 tbsp gelatin powder over the 1/2 cup cold water.
Let it bloom for 10 minutes until it looks like a thick sponge.
Phase 2: Brewing the Syrup
Combine the 2/3 cup cane sugar, 1/3 cup corn syrup, 1/4 cup water, and 1/4 tsp salt in your saucepan. Heat over medium, stirring just until the sugar dissolves. Now, turn the heat up to medium high and stop stirring. Bring it to a boil and watch your thermometer.
Cook 10 mins until it hits exactly 240°F (115°C).
Phase 3: The High Speed Whip
Turn your mixer to low. Slowly pour the hot syrup down the side of the bowl into the bloomed gelatin. Be careful not to splash! Once it's all in, crank the speed to high. Whip for 10-12 minutes until the mixture is a thick, glossy, snow white foam with stiff peaks.
During the final minute, pour in the 1 tbsp vanilla extract.
Phase 4: The Set & Slice
Carefully spread the foam into your prepared pan. Use a spatula to smooth the top, but don't overwork it or you'll deflate those precious bubbles. Let the pan set for 8 hours until the slab feels firm and doesn't stick to your finger.
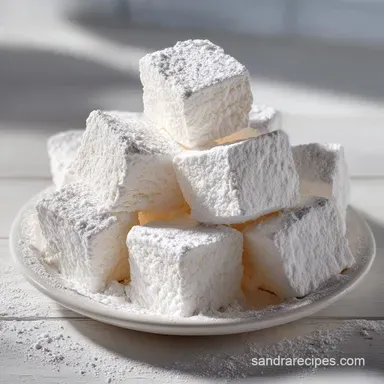
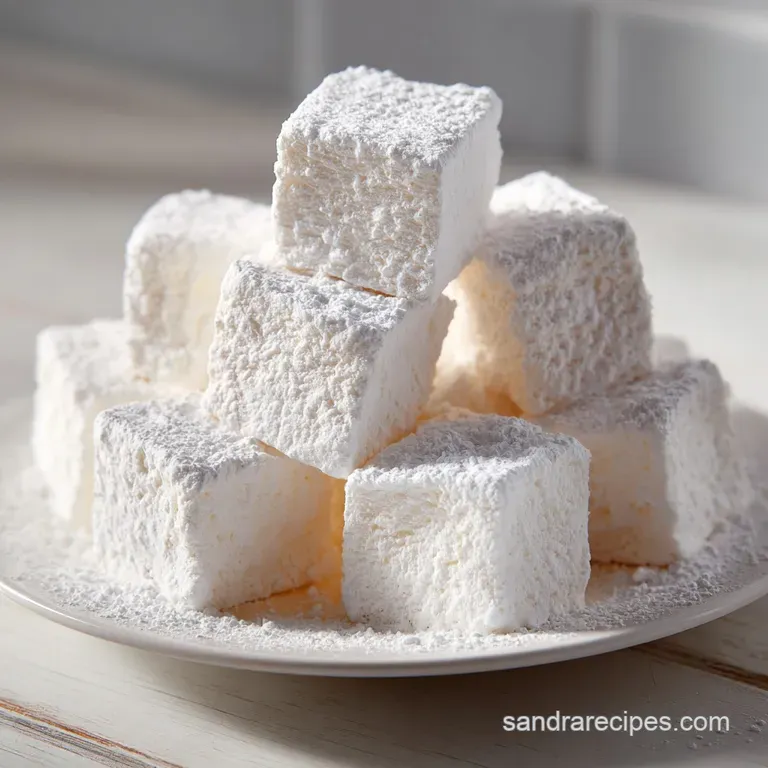
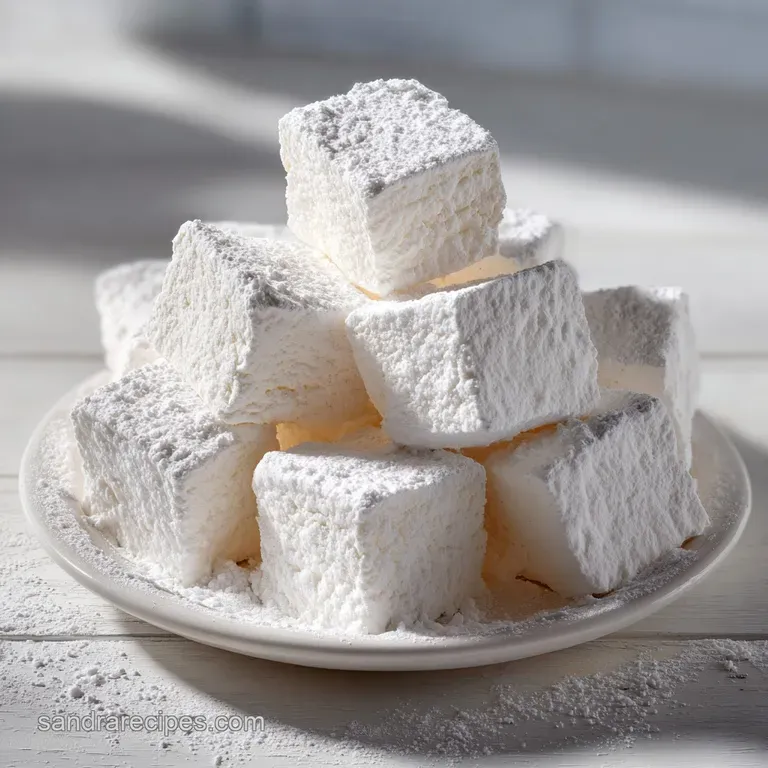
Lift the parchment, dust the top with more sugar starch mix, and slice into 36 squares.
Chef's Note: When slicing, use a sharp knife lightly dusted in the cornstarch mixture. This prevents the knife from dragging through the marshmallow and creating "tears" in the squares.
Fixing Common Texture Issues
Even for experienced cooks, Homemade Marshmallows can be temperamental. The most common issue is usually related to the temperature or the whipping time.
Troubleshooting Common Issues
| Issue | Solution |
|---|---|
| Why Your Treat Is Grainy | This usually happens if the sugar crystallized during the boiling process. This can be caused by stirring the syrup too much once it starts to boil, or having sugar crystals on the side of the pot. To |
| Why Your Treat Is Sticky | Stickiness often comes from under cooking the syrup or not letting the slab set for the full 8 hours. If the syrup doesn't hit 115°C, it won't have the structure to hold itself up. If it's still stick |
| Why Your Treat Collapsed | If your Homemade Marshmallows feel flat or dense, you likely didn't whip them long enough. The mixture needs to be truly stiff before it goes into the pan. If it's still a "soft" peak, it will compres |
Fun Flavor Swaps
Once you've nailed the basic Homemade Marshmallows, you can start experimenting. The base is a blank canvas. For a maple twist, replace the corn syrup with Grade A maple syrup. It gives a deeper, woodsy sweetness that's irresistible in the autumn.
If you want something more gourmet, try infusing your water with peppermint or espresso. For a fruitier vibe, you can fold in a tablespoon of freeze dried strawberry powder during the last minute of whipping. This creates a vibrant pink color and a tart contrast to the sugar.
If you're serving these as part of a larger dessert spread, they pair beautifully with something acidic. I often serve these alongside a creamy lemon posset to balance the richness of the sugar.
| If you want X | Do Y |
|---|---|
| Chocolatey | Fold in 2 tbsp cocoa powder with the vanilla |
| Coffee Flavor | Replace 1 tbsp water with instant espresso powder |
| Toasty Note | Use toasted coconut flakes in the dusting mix |
Adjusting Your Batch Size
If you're just making these for yourself, you can scale the recipe down to a half batch. Use a 4x6 inch pan instead and reduce the setting time by about 20%. When dealing with a half egg or small measurements, I find it's easier to weigh the gelatin in grams.
For larger party batches, I recommend working in doubles rather than quadruples. If you put too much mixture in one stand mixer bowl, you might not get enough air incorporation, and the bottom layer will stay dense.
If you double the recipe, keep the salt and vanilla at 1.5x instead of 2x to avoid overpowering the sweetness.
Truths About Candy Making
There's a lot of misinformation out there about making sweets. Let's clear a few things up.
First, some people say you can use any sugar, but honey or agave will completely change the boiling point and the final chew. Stick to cane sugar for that classic bounce.
Second, there's a myth that you can "save" a collapsed marshmallow by reheating it. Trust me, once the air structure is gone, it's gone. You can't re whip a set marshmallow; you'll just end up with a sticky syrup.
Storage and Freshness Tips
Store your Homemade Marshmallows in an airtight container at room temperature for up to 7 days. Don't put them in the fridge, as the humidity can make the exterior sticky and ruin the "shatter" of the powdered sugar coating.
If you want to save them for longer, you can freeze them for up to 3 months. Just freeze them in a single layer on a tray first, then transfer them to a freezer bag. This prevents them from fusing into one giant marshmallow brick.
To reheat from the freezer, let them thaw at room temperature for about an hour. For a treat, pop them under the broiler for 30 seconds until they are golden and bubbling.
For zero waste, if you have scraps from slicing the edges of the slab, don't toss them! Throw them into a pot of hot cocoa or melt them into a homemade hot chocolate bomb for the kids.
Best Ways to Serve
The most obvious choice is s'mores, but let's get a bit more creative. I love slicing them into thick rounds and stacking them with a piece of dark chocolate and a fresh raspberry. The tartness of the berry cuts through the velvety sugar perfectly.
Another great option is a marshmallow fondue. Gently melt a handful of these with a splash of cream and a pinch of salt, then dip in fresh fruit. It's a fantastic pairing with a Frozen Strawberry Lemonade for a refreshing summer party.
Finally, try them toasted over an open flame or in the oven. Because these are Homemade Marshmallows, they have a slightly different melting point than store-bought ones, resulting in a more luxurious, gooey center that doesn't just disappear into a puddle.
Recipe FAQs
Can we make marshmallows at home?
Yes, it is entirely possible. You only need a stand mixer and a candy thermometer to achieve the correct structural consistency.
Is it worth it to make your own marshmallows?
Yes, for the superior texture and flavor. Homemade versions are significantly fluffier and avoid the artificial preservatives found in store-bought options.
What gives marshmallows its flavor?
Pure vanilla extract provides the signature taste. The base sweetness comes from a combination of granulated cane sugar and light corn syrup.
Can marshmallows help with acid reflux?
No, this is a common misconception. The high sugar content can actually trigger or worsen acid reflux symptoms for many people.
Why are my marshmallows sticky?
You likely undercooked the syrup or sliced them too early. Ensure the syrup reaches exactly 240°F (115°C) and let the slab set for the full 8 hours.
How to store homemade marshmallows?
Place them in an airtight container at room temperature. Keep them for up to 7 days, but avoid the fridge as humidity ruins the powdered sugar coating.
Why are my marshmallows grainy?
Sugar crystallized during the boiling process. This occurs if you stir the syrup after it begins to boil or leave sugar crystals on the sides of the pot.
Pillowy Homemade Marshmallows