Fudgy Red Velvet Brownies: Rich and Velvety
- Time:15 minutes active + 30 minutes bake = Total 45 minutes
- Flavor/Texture Hook: Velvety, dense interior with a silky, tangy frosting
- Perfect for: Valentine's Day, birthday parties, or a fancy weekend treat
- Fudgy and Vibrant Red Velvet Brownies
- The Logic Behind the Texture
- Component Analysis
- Elements for the Batter
- Essential Gear for Baking
- Step-by-Step Guide to the Bake
- Fixing Common Brownie Blunders
- Adjusting the Batch Size
- Common Baking Misconceptions
- Storage and Waste Reduction
- Savory and Sweet Pairing Ideas
- Recipe FAQs
- 📝 Recipe Card
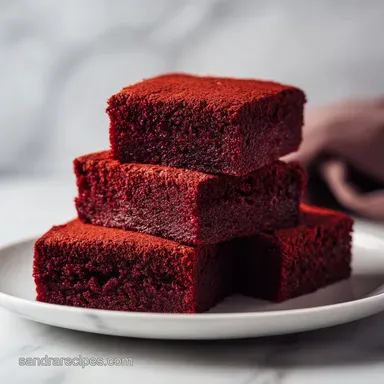
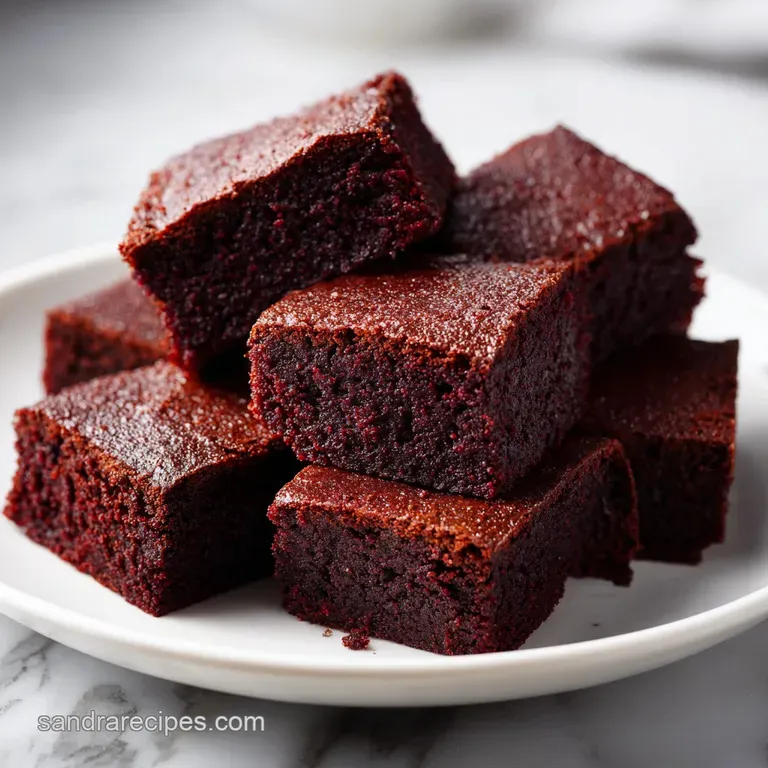
Fudgy and Vibrant Red Velvet Brownies
That smell is the first thing that hits you- a deep, warm cocoa aroma mixed with a sharp, bright zing of lemon. I remember the first time I tried making these for a friend's anniversary. I was so focused on getting that vivid crimson color that I almost forgot the lemon juice.
When I tasted my first test batch without the acidity, it just tasted like a chocolate brownie with a costume on. It lacked that specific, nostalgic "tang" that makes red velvet actually feel like red velvet.
Once I added the lemon juice, everything shifted. The batter became glossy, and the final result had this velvety, melt in-your mouth feel that you just can't get with standard cocoa powder and sugar.
It's a specific kind of indulgence, where the richness of the butter and almond flour is cut right through by the cream cheese frosting. Trust me on this, the contrast is what makes it work.
You're going to love how these come together. They aren't like those cakey red velvet cupcakes that feel like sponges; these are dense, rich, and almost truffle like in the center. We're going for a slight underbake here, which is the secret to that silky texture.
If you've ever overbaked a brownie into a dry brick, this is your chance for redemption.
The Logic Behind the Texture
Instead of a long lecture, here is the real reason these brownies feel so different from a standard cake.
- Acid Base Reaction
- The lemon juice reacts with the baking soda to create tiny air bubbles, which keeps the almond flour from feeling too heavy.
- Nut Fat Buffer
- Almond flour provides a higher fat content than wheat flour, which ensures the center stays velvety and doesn't dry out in the oven.
- Sugar Caramelization
- Coconut sugar doesn't just sweeten; it adds a subtle caramel note that deepens the cocoa flavor.
- Emulsion Stability
- Whisking the egg and lemon juice vigorously creates a stable emulsion that traps air, giving the brownies a slight lift without making them "cakey".
| Servings | Ingredient Adjustments | Pan Size | Cook Time |
|---|---|---|---|
| 8 people | Use 1/2 of all ingredients | 4x4 inch square | 22-25 minutes |
| 16 people | Follow standard recipe | 8x8 inch square | 30 minutes |
| 32 people | Double all ingredients | 9x13 inch pan | 35-40 minutes |
I've found that if you're making these for a larger crowd, you have to be careful with the pan size. A 9x13 pan spreads the batter thinner, so keep a close eye on the oven around the 30 minute mark to ensure they don't overcook.
Component Analysis
To get the most out of this recipe, you need to understand what each part is doing. It's not just about following a list; it's about knowing why these specific items are in the bowl.
| Ingredient | Science Role | Pro Secret |
|---|---|---|
| Almond Flour | Structural Base | Sift it to avoid clumps of nut meal |
| Lemon Juice | pH Modifier | Freshly squeezed is better than bottled |
| Coconut Sugar | Flavor/Sweetener | Adds a moisture retaining quality |
| Cream Cheese | Tangy Contrast | Must be fully softened for a silky finish |
When you're working with almond flour, remember that it doesn't behave like all purpose flour. There's no gluten to develop, so you don't have to worry about over mixing in the same way you would with a cake. However, the fat content is much higher, which is why these brownies feel so rich. If you love a really dense treat, you might also enjoy my edible cookie dough recipe for a similar, velvety mouthfeel.
Elements for the Batter
Right then, let's get into what you actually need to pull this off. I've listed the exact amounts from my successful batches. Don't eyeball the baking soda, or you'll end up with a metallic taste.
For the Brownie Base:
- 1/2 cup (115g) unsalted butter, melted and cooledWhy this? Provides the richness and carryover moisture
- 3/4 cup (150g) coconut sugarWhy this? Deeper flavor than white sugar
- 1 large egg (50g)Why this? Binds the fats and adds structure
- 1 tsp (5ml) vanilla extractWhy this? Rounds out the sharp cocoa notes
- 1 tbsp (15ml) red food coloringWhy this? Essential for that iconic look
- 1 tbsp (15ml) lemon juiceWhy this? Provides the signature red velvet tang
- 1 cup (125g) almond flourWhy this? Creates a gluten-free, velvety crumb
- 3 tbsp (22g) unsweetened cocoa powderWhy this? Bitter contrast to the sugar
- 1/4 tsp (1.5g) baking sodaWhy this? Reacts with lemon for a slight lift
- 1/4 tsp (1.5g) kosher saltWhy this? Enhances all other flavors
For the Lightened up Cream Cheese Frosting:
- 4 oz (115g) cream cheese, softenedWhy this? The core tangy element
- 2 tbsp (30g) Greek yogurtWhy this? Lightens the texture without losing creaminess
- 1/2 cup (60g) powdered sugarWhy this? Stability and sweetness
- 1/2 tsp (2.5ml) vanilla extractWhy this? aromatic finish
| Original Ingredient | Substitute | Why It Works |
|---|---|---|
| Coconut Sugar | Brown Sugar | Similar moisture level. Note: Slightly more molasses flavor |
| Almond Flour | Oat Flour | Similar density. Note: Less richness, slightly grainier |
| Greek Yogurt | Sour Cream | Nearly identical tang. Note: Slightly heavier feel |
| Red Food Coloring | Beet Powder | Natural color. Note: Earthier taste and paler red |
Honestly, don't even bother with low-fat cream cheese here. It doesn't whip up the same way and can leave the frosting feeling watery. You want the full fat version so it holds its shape when you slice into those 16 squares.
Essential Gear for Baking
You don't need a professional kitchen to make these, but a few specific tools make the process way smoother. If you're just starting out, a simple hand mixer is more than enough.
- 8x8 inch Baking Pan: The standard for this recipe. A glass pan works, but metal conducts heat faster for better edges.
- Parchment Paper: This is non negotiable. I've lost too many brownies to the sides of a pan because I tried to just grease it with butter.
- Sifter or Fine Mesh Strainer: Almond flour and cocoa powder love to clump. Sifting ensures a velvety texture.
- Electric Hand Mixer: Specifically for the frosting. You can do it by hand, but it'll be a workout and might stay lumpy.
- Rubber Spatula: Perfect for folding in the dry ingredients without knocking out the air.
Step-by-step Guide to the Bake

Let's crack on. The key here is not to overwork the batter. Once the flour goes in, we're just blending, not beating.
Phase 1: Preparing the Batter
- Whisk the melted butter and coconut sugar. Keep going until the mixture is smooth and the sugar has started to incorporate into the fat.
- Add the egg, vanilla, red food coloring, and lemon juice. Whisk vigorously until the batter looks glossy and uniform. You want a bright, consistent red color here.
- Sift the almond flour, cocoa powder, baking soda, and salt directly into the wet mixture. Note: Sifting prevents those annoying white clumps of almond flour in the finished brownie.
- Use a spatula to fold the ingredients together. Stop the moment no streaks of flour remain. Do not overmix, or you'll lose the aeration we created in step 2.
Phase 2: Executing the Bake
- Line an 8x8 inch baking pan with parchment paper. Make sure you leave an overhang on the sides so you can lift the whole block out later.
- Spread the batter evenly into the pan. Bake for 30 minutes. Use a slight underbake technique- the center should still have a very slight jiggle when you shake the pan.
- Remove from the oven and let the brownies cool on the counter. Let the residual heat finish the cooking process while they sit. This is where the fudgy center is actually formed.
Phase 3: Applying the Finish
- Prepare the frosting by using an electric hand mixer. Combine softened cream cheese, Greek yogurt, powdered sugar, and vanilla extract. Beat until the frosting is silky and no lumps remain.
- Spread the frosting over the cooled brownies. Cut into 16 squares using a warm knife for those clean, sharp edges.
Chef's Tip: To get those perfectly clean squares, dip your knife in hot water and wipe it dry between every single cut. It prevents the frosting from dragging into the red brownie layer.
Fixing Common Brownie Blunders
Even with a guide, things can go sideways. Usually, it's a temperature issue or a mixing mistake.
Why Your Brownies Sunk in the Middle
This usually happens if the baking soda reacted too quickly or if you opened the oven door too often during the first 15 minutes. This causes the air bubbles to collapse before the structure is set.
Why Your Frosting is Grainy
Grainy frosting is almost always caused by cold cream cheese. If it's not truly room temperature, it won't emulsify with the powdered sugar and yogurt, leaving tiny hard bits of cheese.
| Problem | Root Cause | Solution |
|---|---|---|
| Dry, cakey texture | Overbaked | Reduce bake time by 3-5 minutes next time |
| Pale red color | Poor quality dye | Use a gel based food coloring for more intensity |
| Frosting sliding off | Brownies were warm | Cool brownies completely in the fridge before frosting |
Before you put your pan in the oven, run through this quick checklist to make sure you haven't missed a beat.
- ✓ Pat your measuring cups dry before scooping almond flour to prevent clumping.
- ✓ Ensure the butter is cooled slightly so it doesn't scramble the egg.
- ✓ Check that your baking soda isn't expired (drop a pinch in vinegar to see if it fizzes).
- ✓ Use a room temperature egg for a smoother emulsion.
- ✓ Leave the brownies alone for at least 1 hour before frosting.
Adjusting the Batch Size
Sometimes you need a tiny treat for yourself, and other times you're feeding the whole neighborhood. Scaling these is pretty easy, but there are a few tricks.
Scaling Down (Half Batch): If you're making a half batch, use a 4x4 inch pan or a small loaf pan. Since the volume is lower, the heat penetrates the center faster. Reduce your baking time by about 20%, starting to check them at 22 minutes.
For the egg, crack it into a bowl, beat it, and use exactly 25g.
Scaling Up (Double Batch): When doubling, move to a 9x13 inch pan. I recommend only increasing the salt and spices to 1.5x rather than a full 2x, as they can become overwhelming in larger volumes. Liquids should be reduced by about 10% to prevent the batter from becoming too runny.
| Method | Time | Texture | Best For |
|---|---|---|---|
| Oven Bake | 30 min | Fudgy/Dense | Traditional blocks |
| Air Fryer | 18-22 min | Crispy Edges | Small batches |
| Slow Cooker | 2 hours | Cakey/Moist | Potluck style |
If you find yourself craving something even quicker, you might want to try a brownie mug cake for a single serving fix that takes only two minutes.
Common Baking Misconceptions
There are a few things people tell you about red velvet that just aren't true. Let's clear the air.
The "Chocolate Cake" Myth: Many people say red velvet is just chocolate cake with food coloring. That's a lie. The addition of lemon juice (or vinegar) and the specific reaction with the cocoa powder creates a completely different flavor profile and crumb structure.
The "Searing" Logic: Some people think you should "sear" the edges of the pan with butter to prevent sticking. While it feels intuitive, parchment paper is far superior. Searing only helps the very edges; parchment protects the entire base.
Storage and Waste Reduction
You don't want these to go to waste, and since they're so rich, you probably won't eat 16 squares in one sitting.
Fridge and Freezer Guidelines: Keep these in an airtight container in the fridge for up to 5 days. The cold actually improves the texture, making them feel more like a fudge. For the freezer, wrap individual squares in parchment paper and then place them in a freezer bag.
They'll stay great for up to 3 months. To reheat, let them thaw in the fridge overnight or pop a square in the microwave for 10 seconds if you want that "fresh from the oven" feel.
Zero Waste Tips: If you have leftover frosting, don't throw it away! Use it as a dip for fresh strawberries or apple slices. If you have a bit of almond flour left over from the bag, mix it with a little honey and cinnamon for a quick homemade granola topper.
Even the parchment paper can be composted if it's unbleached and non silicone coated.
Savory and Sweet Pairing Ideas
These brownies are an explosion of flavor, so you need sides that balance that intensity.
The Contrast Strategy: Because the brownies are so dense and sweet, pair them with something acidic or bitter. A cup of strong, black espresso is the ultimate companion- the bitterness of the coffee cuts right through the cream cheese frosting.
If you're serving them at a party, put out a platter of tart raspberries or blackberries. The fruitiness complements the lemon notes in the batter.
The Texture Strategy: Since the brownies are velvety, something with a crunch works well. A side of toasted almonds or a sprinkle of sea salt on top of the frosting adds a necessary textural break. For a more decadent approach, serve a square slightly warmed with a scoop of cold vanilla bean ice cream.
The heat from the brownie melting the ice cream creates a sauce that is absolutely irresistible.
Recipe FAQs
What's the difference between red velvet brownies and regular brownies?
They include red food coloring and lemon juice. This combination creates the signature crimson hue and a subtle tang that differentiates them from standard cocoa brownies.
How do I turn a standard batter into red velvet?
Stir in red food coloring and lemon juice. These two ingredients provide the characteristic color and the acidic flavor profile associated with red velvet.
What are common mistakes when making red velvet brownies?
Overworking the batter is the most frequent error. Fold the almond flour and cocoa powder until just combined to prevent the texture from becoming tough.
Is red velvet really just chocolate cake with red dye?
No, this is a common misconception. The addition of lemon juice provides a specific acidity and flavor profile that sets it apart from plain chocolate cake.
How do I store these brownies to keep them fresh?
Place them in an airtight container in the fridge. They stay fresh for up to 5 days, and the cold temperature enhances the fudge like texture.
Can these red velvet brownies be frozen?
Yes, they freeze well for up to 3 months. Wrap individual squares in parchment paper before placing them in a freezer bag to prevent sticking.
Why should I underbake these brownies?
It prevents them from drying out. Baking for exactly 30 minutes and allowing residual heat to finish the cooking process ensures a moist, fudgy center.
Red Velvet Brownies